

DNA Motoring Fender Roller Assembly
Our fender roller assembly gives you professional control when modifying wheel wells for wider wheels and lowered suspensions. The heavy-duty steel construction and adjustable roller arm let you reshape fender lips gradually and safely, preventing paint cracking and metal warping.
Designed for mechanics, body shops, and serious DIY enthusiasts, this assembly mounts securely to your vehicle’s wheel hub and provides smooth, even pressure distribution across the entire fender edge. Whether you’re fitting aggressive wheel offsets or repairing minor fender damage, our roller delivers consistent results without the risk of hammer-and-dolly methods.
What’s included in your assembly
Assembly construction and components
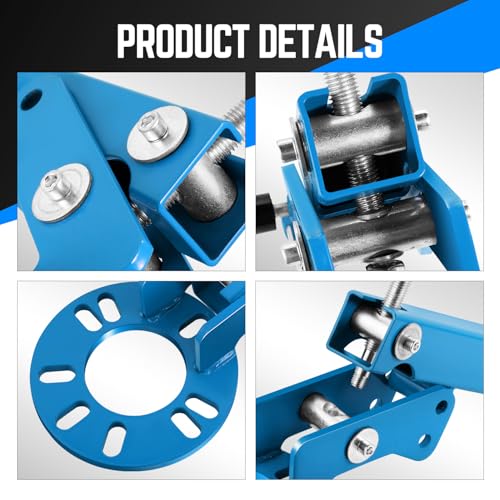
The dna motoring fender roller assembly features a precision-engineered steel frame that mounts directly to your vehicle’s wheel hub using included adapter plates. The adjustable roller arm extends and retracts to match your fender’s contour, while the urethane roller pad provides smooth contact with the metal surface.
Each component is built to withstand the forces involved in metal forming work. The main pivot point uses hardened steel bushings that won’t develop play after repeated use, and the roller itself spins freely on sealed bearings to prevent dragging or catching.
Compatibility and fitment
Our fender roller assembly works with most passenger vehicles, light trucks, and SUVs equipped with 4-lug or 5-lug wheel bolt patterns. The quick-mount hub adapter includes spacers for common PCD measurements from 100mm to 114.3mm.
The adjustable roller arm accommodates wheel diameters from 12 inches up to 20 inches, making it suitable for everything from classic cars to modern sport compacts. Front and rear fenders can both be rolled using the same tool—simply adjust the arm length and angle to match each fender’s unique profile.
Operating the fender roller safely
Mount the dna motoring fender roller assembly to your wheel hub with the vehicle safely supported on jack stands—never work under a car supported only by a hydraulic jack. Thread the adapter studs through your hub and secure with the provided lug nuts, tightening in a star pattern to ensure even pressure.
Position the roller pad against the inner fender lip and adjust the arm so the pad makes light contact. Apply heat to a 6-inch section of the fender lip for 30-45 seconds, then slowly rotate the roller arm through that section. Make 3-5 complete passes, raising the roller slightly each time, before moving to the next section.
Essential Wheel Fitment Tools


Rated 4.8 by verified buyers
Fender Roller Assembly Questions
The included universal hub adapter fits most 4-lug and 5-lug bolt patterns commonly found on passenger cars, sport compacts, and light trucks. The adapter includes spacers for PCD measurements from 100mm to 114.3mm, covering Honda, Toyota, Nissan, Ford, GM, and most European applications.
If your vehicle uses a 6-lug pattern or an uncommon PCD measurement, you may need a custom adapter plate. Verify your wheel bolt pattern before ordering to ensure compatibility.
Yes, the fender roller assembly mounts directly to your vehicle’s wheel hub where the wheel normally attaches. You’ll need to safely lift and support your vehicle on jack stands, remove the wheel, then mount the roller using the included hub adapter and lug nuts.
This direct-mount design provides a stable pivot point and allows the roller to follow your fender’s natural contour as you work around the wheel well.
Most users gain between 10mm and 20mm of additional clearance by rolling the inner fender lip outward. The exact amount depends on your fender’s original shape, metal thickness, and how aggressively you roll.
Work gradually through multiple passes rather than trying to achieve maximum clearance in one session. This prevents stress cracks in the paint and metal fatigue. For extreme clearance needs beyond 20mm, consider combining rolling with fender pull techniques or consulting a professional fabricator.
While it’s physically possible to roll fenders cold, we strongly recommend applying controlled heat to both the paint and metal before rolling. Heat softens the materials and allows them to stretch gradually rather than crack or fracture.
Use a heat gun to warm the fender lip to approximately 150-180°F before each pass with the roller. Cold rolling significantly increases the risk of paint damage and can leave stress marks in the metal that may crack later.
Properly executed fender rolling does not compromise structural integrity. The fender lip is a cosmetic edge, not a load-bearing component, and reforming it gradually with heat allows the metal to redistribute stress evenly.
Avoid excessive rolling that thins the metal or creates sharp bends. If you encounter significant resistance during rolling, stop and apply more heat rather than forcing the metal. Heavily rusted or previously damaged fenders should be repaired or replaced before rolling.
After each use, wipe down all steel surfaces with a shop towel and apply a light rust preventative coating. Inspect the urethane roller pad for embedded debris, flat spots, or excessive wear—replace it if it no longer spins freely.
Check all mounting hardware for tightness and inspect the main pivot bushings for play or wear. Store the assembly in a dry location with the roller arm retracted to prevent accidental bending during storage. With proper care, your fender roller will provide years of reliable service.
Yes, but aluminum requires extra care and lower working temperatures than steel. Aluminum is more prone to work hardening and stress cracking, so make even more gradual passes and apply moderate heat (around 120-140°F maximum).
Test your technique on an inconspicuous area first. If you notice any surface cracking or unusual resistance, stop immediately and consult with an experienced aluminum fabricator. Some aftermarket aluminum fenders are too thin for safe rolling and may require professional forming techniques.